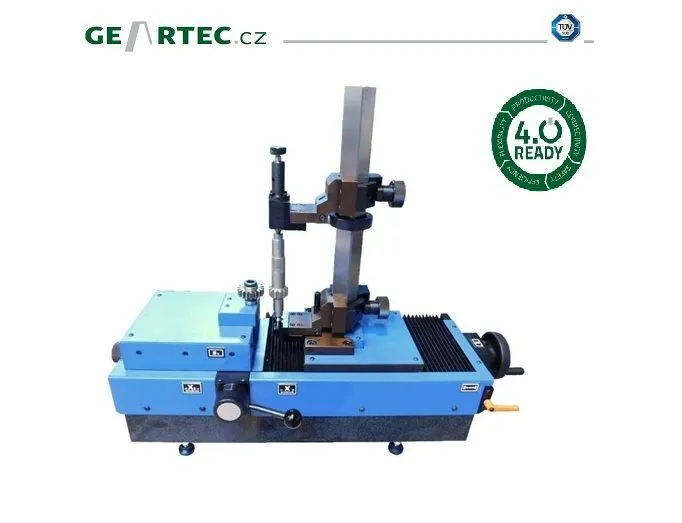


The GTS200 E (E stands for external gearing) is based on a substantial granite component to
prevent the measurement from any vibration that may have an impact on measuring parts. The
machine is equipped with high accuracy linear encoders by Heidenhain (Germany) and
Renishaw (the UK) linear scale optionally allowing to measure parts in the highest quality and
best repeatability.
The driving axis (for the master gear) is assembled with a Maxon motor unit (by Maxon motors,
Switzerland) including a gearbox and rotary encoder.
The machine may also be equipped with additional encoders / sensor, see the quotation.
A master gear is clamped fleetingly as a standard on a stationary arbor (diameter 22 mm). Of
course, it may be adjusted to your needs. Tested parts are possible to clamp on an arbor as
well as between centers.
Measured deviations according to current Standards
---------------------------------------------------------------
Double flank deviations
Fi" - Total composite error
fi" - Tooth to tooth error
Fr" - Radial runout (average value of double flank deviation)
Other measurable deviations
Aa - Fluctuation of axis distance
Mz - Measure Over Teeth (for External Gearing)
Mdk - Measure over ball
j - Backlash
Characteristics of the program
---------------------------------------------------------------------------------
• Measuring process in program is controlled from data input to evaluation of results.
• No advanced PC knowledge required to operate the instrument.
• All measuring parameters are saved to reduce setting up the time.
• Measured values can be evaluated in DIN, ISO, AGMA BS standards or by company specified values
• Exact display of the double flank diagram showing Fi", fi" and the average value of Fr"
• Location of detected tooth nicks
• Measuring of backlash and thickness over teeth
• Deviations are measured in microns or inches
• Saving of diagrams
• Free selection of counting/numbering and saving of the measured results
• Input of parameters in /mm/ or /inch/, and in module or DP, CP
• Multilingual application (languages upon request)
• Company logo on printout records
• Graphic display of good and rejected parts
• Data export via TXT or CSV format
• Data backup and re-entry
• FFT-Analysis (Frequency analysis)
• Export of data acc. to Industry 4.0 / OPC-UA protocol - optional and many other
---------------------------------------------------------------------------------
Our newest hardware is based on minimal but efficient and reliable solution. It is boxed into a good looking and modern aluminum chassis with several nicely done connectors from rear side for the probes and encoders.
Evaluation and control electronics, safety fuse(s), servo motor controller, power supply as well as digital inputs/outputs unit is in-built into this box.
The unit is absolutely silent without any fans disturbing your work by audible noise.
Part of the system is a professional all-in-one computer based powerful Intel Core i5 processor with 8GB DDR RAM running on
Windows 11 (64bit) operation system. 23.8-inch* wide, full HD resolution screen provides clear view of every pixel of the measuring diagram and 256GB SSD* disk supports it with fast data transfer.
(*upon current availability and decision of manufacturer).
Our system that is based on a fully digital technology will exceeded all expectations you may have on this system. The system provides excellent feedback to the customer (machine operator), reliable and extremely accurate results, several additional software modules, precise motor adjustment (fine tuning, truly precise speed adjustment), independent of the operating system of the computer (whatever update is possible and does not limit usage of the machine), 64-bit technology, smooth and requested integration to company network and last but not least compliance to INDUSTRY 4.0 requirements.
Bar-Code Reader
Bar-code readers can be used with an infinite diversity of data, for this reason we will need some more correspondences with your IT experts.
The quoted Bar-code reader gun is a very good instrument by Cognex but if you have experience and/or standard preferred please let us know.
Consider carefully from where the bar-code (or QR code) will be read (surface finishing, reflection and goodness of the printing).
TECHNICAL DATA OF THE GTS-200E MACHINE
Module range 0.5 – 4 mm
Center distance range for basic slide 60 – 150 mm
Diameter of measured gear, max. 240 mm (clamped on arbor)
Diameter of measured gear, max. 150 mm (clamped between centers)
Weight of measured gear, max. 15 kg
Measuring force adjustment 1 – 20 N (manually adjustable)
Measuring accuracy down to 1 µm
Master gear arbor, diameter 22 mm
(if different diameter needed, must be discussed in advance)
These parameters may change if technically wise and/or upon decision of the manufacturer to meet customer’s
demands.
The hardware includes:
- New control unit with integrated electronics
- All-in-one computer
- OS Windows 11 /64 bit in English version (other languages upon request)
- Needed wiring
Included accessories
• GTS200 E machine in basic variation
• One piece of master gear arbor (standardly ø 22 mm)
• Linear encoder for axis X
• Measuring application (in basic version), statistical evaluation SW Module SPC is included
• Control unit with installed OS, drivers and necessary engines and supportive software
• All in one computer with installed OS and measuring application
• USB-stick with a backup of the measuring software
• Complete machine documentation in ENGLISH on USB in PDF (or other relevant) format. It includes Declaration of Conformity (CE), Machine geometry certification, measuring capability Certification, Wiring diagram, User's manual.
• Wires
We use cookies to improve your experience. Privacy Policy.